Are there no available Wi-Fi networks around you, but you urgently need internet access on your Windows PC? If you have an iPhone with cellular data, you can easily share your internet connection using a USB cable. This method is called USB tethering, and it’s one of the most stable and secure ways to connect your PC to the internet.
In this detailed guide, you’ll learn how to share your iPhone internet connection with a Windows PC via USB cable, including setup instructions, troubleshooting tips, and important requirements.
Why Use USB Tethering Instead of Wi-Fi?
Before we dive into the steps, here’s why USB tethering is often the better option:
-
✅ More stable connection than Wi-Fi hotspot
-
✅ Faster speeds in many cases
-
✅ Lower battery drain compared to wireless hotspot
-
✅ More secure (no one else can connect without physical access)
If you’re working on important tasks, uploading videos, or browsing securely, USB tethering is highly recommended.
What You Need Before You Start
To successfully share your iPhone internet connection with your PC, make sure you have:
-
An iPhone with active cellular data
-
A Windows PC
-
An original or MFi-certified Lightning cable
-
Personal Hotspot enabled on your iPhone
⚠️ Using a non-certified cable may cause connection issues or prevent your computer from detecting the device properly.
Step 1: Enable Cellular Data and Personal Hotspot on iPhone
First, ensure your iPhone is ready to share its internet connection.
-
Open Settings on your iPhone
-
Tap Cellular (or Mobile Data)
-
Turn Cellular Data ON
-
Go back and tap Personal Hotspot
-
Enable Allow Others to Join
Once this is enabled, your iPhone is ready to share its internet connection.
Step 2: Connect Your iPhone to the PC via USB Cable
Now plug your iPhone into your Windows computer using:
-
An original Apple Lightning cable, or
-
An MFi-certified (Made for iPhone) cable
After connecting:
-
If this is your first time connecting, your iPhone will display a prompt:
“Trust This Computer?” -
Tap Trust
-
Enter your passcode if prompted
This step allows your computer to communicate with your iPhone.
Step 3: Disable Wi-Fi on Your Windows PC
To avoid connection conflicts:
-
Turn OFF Wi-Fi on your Windows PC
-
This ensures your computer prioritizes the USB (Ethernet) connection from your iPhone
This step helps prevent interruptions during internet sharing.
Step 4: Access Network Settings on Windows
Now you need to verify that Windows recognizes your iPhone connection.
Method 1: Using Run Command
-
Press Windows Key + R
-
Type:
control -
Press Enter to open the Control Panel
Navigate to Network Settings
-
Click Network and Internet
-
Select Network and Sharing Center
-
Click Change adapter settings (on the left sidebar)
This will open the Network Connections window.
Step 5: Wait for the Ethernet Connection to Appear
After a few seconds, Windows should detect your iPhone as a new network connection.
You will see:
-
An Ethernet connection
-
It may show your device name (e.g., “Apple Mobile Device Ethernet”)
-
Status should display as Connected
Once this appears active, your USB tethering is successfully established.
Step 6: Start Browsing the Internet
That’s it! 🎉
Your Windows PC is now using your iPhone’s cellular data via USB cable.
You can now:
-
Browse websites
-
Download files
-
Upload videos
-
Access email
-
Work online
All through your iPhone’s mobile data connection.
Troubleshooting: If It Doesn’t Work
If your PC does not detect the connection:
1. Update iTunes
Windows sometimes requires Apple drivers installed via iTunes to recognize the iPhone properly.
Download and install the latest version of iTunes from Apple’s official website.
2. Try Another USB Port
Switch USB ports on your PC.
3. Use a Certified Cable
Cheap cables often cause detection issues.
4. Restart Both Devices
Restart your iPhone and PC, then try again.
Is USB Tethering Safe?
Yes. USB tethering is generally safer than Wi-Fi hotspot because:
-
It requires physical connection
-
No password sharing
-
Reduced risk of unauthorized access
However, always monitor your data usage to avoid exceeding your mobile plan limits.
iPhone USB Tethering vs Android USB Tethering: What’s the Difference?
If you’re wondering how sharing internet via USB differs between an iPhone and an Android device, the process is similar in concept — but the setup, compatibility, and flexibility are quite different.
Below is a detailed comparison to help you understand the key differences.
1️⃣ Setup Process Comparison
📱 iPhone (USB Tethering)
With an iPhone, USB tethering requires:
-
Turning on Cellular Data
-
Enabling Personal Hotspot
-
Connecting via Lightning cable
-
Tapping “Trust This Computer”
-
Ensuring Windows has Apple drivers (often via iTunes)
⚠️ On Windows PCs, drivers are usually required for the connection to work properly.
🤖 Android (USB Tethering)
On Android, the process is typically:
-
Turn on Mobile Data
-
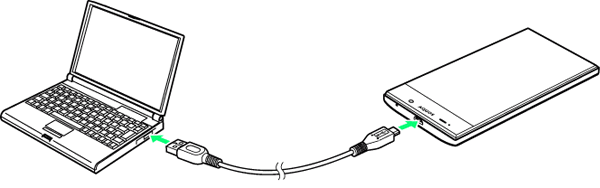
Connect via USB cable
-
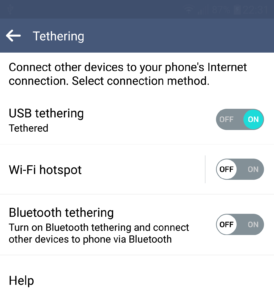
Go to Settings → Network & Internet → Hotspot & Tethering
-
Toggle USB Tethering ON
✅ No need to “trust” the computer
✅ No iTunes required
✅ Windows usually installs drivers automatically
Android is generally more plug-and-play on Windows.
2️⃣ Cable & Compatibility Differences
iPhone
-
Requires original or MFi-certified Lightning cable
-
Non-certified cables may fail to establish connection
-
Works best within Apple’s ecosystem
-
Windows may require Apple Mobile Device Support
Android
-
Uses USB-C or Micro-USB (depending on model)
-
More flexible with third-party cables
-
Less strict certification requirements
👉 Android devices are generally more forgiving with cables.
3️⃣ Driver Requirements
| Feature | iPhone | Android |
|---|---|---|
| Requires extra drivers? | Often Yes (iTunes) | Usually No |
| Automatic detection | Sometimes | Almost Always |
| Trust prompt required | Yes | No |
This is one of the biggest differences.
iPhone tethering depends on Apple-specific drivers, while Android uses standard USB networking drivers supported natively by Windows.
4️⃣ Customization & Control
iPhone:
-
Limited advanced settings
-
Cannot easily modify network configuration
-
Apple controls most functionality
Android:
-
More customization options
-
Some devices allow:
-
Changing USB configuration mode
-
Developer options for networking
-
Advanced tethering controls
-
Android offers more technical flexibility.
5️⃣ Speed & Stability
In real-world usage:
-
USB tethering on both platforms is stable
-
Speed depends mainly on:
-
Your mobile network strength
-
Your carrier plan
-
Your device hardware
-
However:
-
iPhone USB tethering is very stable once connected
-
Android may sometimes disconnect if battery optimization is aggressive
6️⃣ Security Comparison
Both methods are secure because:
-
They require physical cable connection
-
They are not broadcast like Wi-Fi hotspots
-
No password is needed for USB tethering
But iPhone adds an extra layer:
-
“Trust This Computer” approval system
That adds additional device-level security.
7️⃣ Ecosystem Differences
-
iPhone works more seamlessly with macOS devices.
-
Android works universally with Windows and Linux systems.
If you are using a Windows PC:
👉 Android tends to be slightly easier to set up
👉 iPhone may require one extra step (drivers/trust prompt)